
How To Sign Up On Bluehost
In this tutorial, I’m going to tell you how to sign up on Bluehost with your own website with simple steps.
The very first thing is, you need to signup with the Bluehost.
Now, there is a group of different web hosts that you can use easily. It is a better option for a startup. This is the best hosting.
They are very cheap and the best option on the market. It helps the beginner in establishing their business. Bluehost has a lot of options and features for web hosting, given below.
- Unlimited Disk Storage
- cPanel Account Control Panel
- 3 Different Webmail (Web-Based E-mail) Solutions
- cPanel Account Control Panel
- FTP Access
- Web File Manager
- Secure Shell (SSH) Access
STEP 1. GO TO BLUEHOST.COM
Go to the Bluehost website and press the “get started now” button. It will be showing on the homepage.

STEP 2. CHOOSE A WEB HOSTING PLAN
Once you press the get started now button, you see the four shared hosting plans to choose from. Basic plan, Plus plan, Prime and business pro.
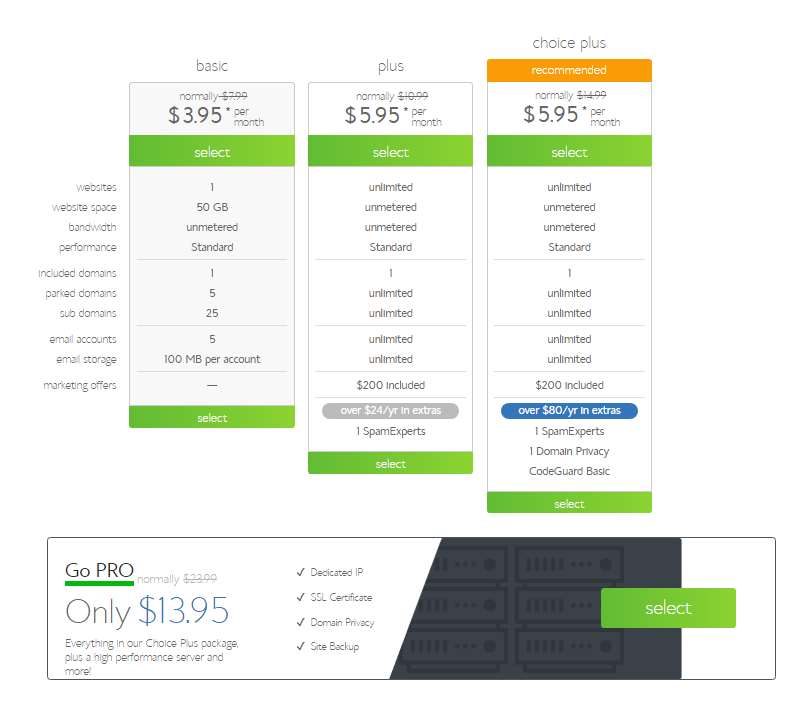
Here are some of the features you will get with each one:
BASIC PLAN
- Host one website with 50GB of space
- Unmetered bandwidth
- Free SSL certificate
- Get 1 included domain and 5 parked domain
- 5 email accounts with 100MB per account
- [This is the plan I recommend you start out with]
PRIME PLAN
- Host unlimited websites with unmetered space
- Unlimited email accounts and storage space
- Includes website backups, domain privacy, and more
PLUS PLAN
- Host unlimited websites with unmetered space
- Unlimited email accounts with unlimited storage space
- Included spam protection
BUSINESS PRO PLAN
- Host unlimited websites with unmetered space
- Unlimited email accounts with unlimited storage space
- Included spam protection
I can suggest that you can start with a starting plan (basic plan). It is very easy and cheaper as well. You can upgrade the plan in the future if you need more features and functionality.
If you want to use only a single website or a personal blog. Then you should not need to go for other packages.
STEP 3. CHOOSE YOUR DOMAIN NAME
Once you have picked a plan you will be asked to enter your domain name.
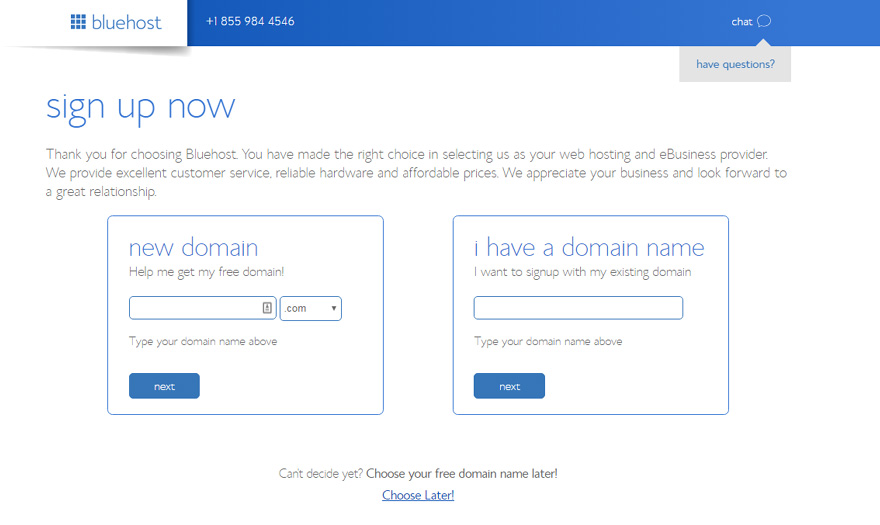
If you’ve already got a domain name, just enter it in and click “Next” in the “I have a domain name” form.
If you aren’t ready to choose a domain right this moment, you can do it at a later point in your website setup.
Your domain doesn’t have to end in .com. You can choose a different site ending if you wish, e.g .net, .org, .us, .biz, and .info if the first choice for your domain isn’t available.
STEP 4. ENTER YOUR PERSONAL INFORMATION
To create your account, just enter your personal information on the “create your account” page.
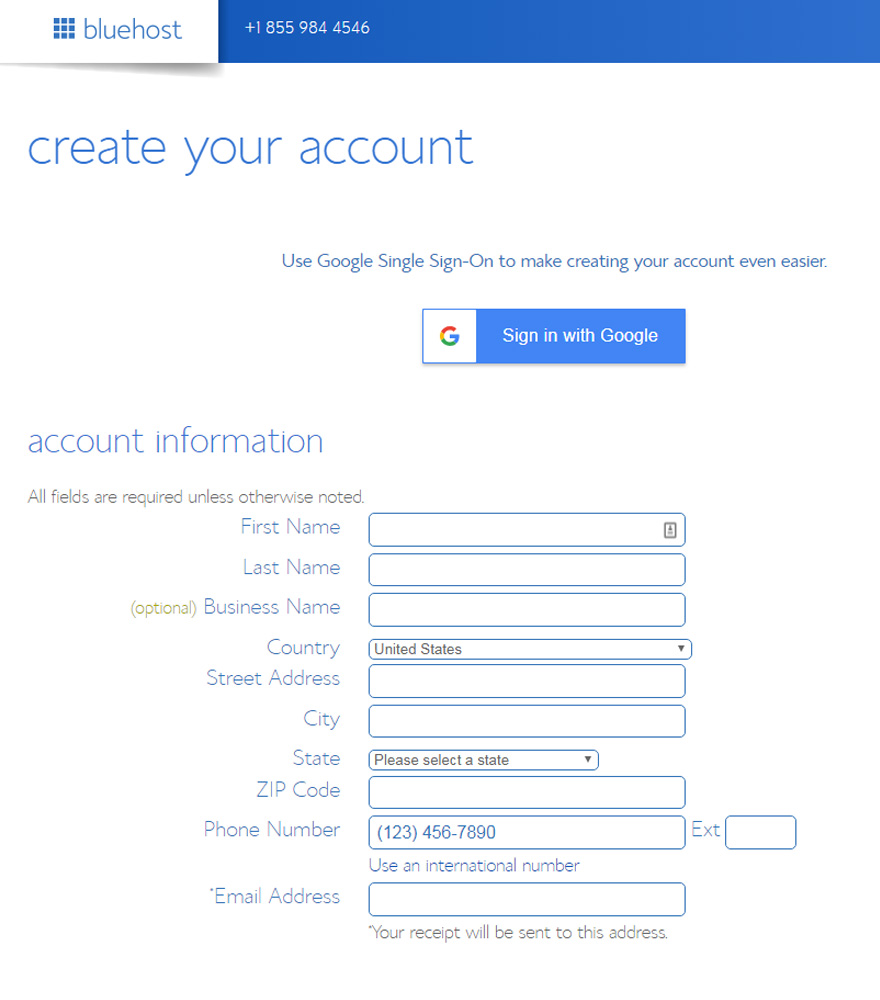

It is the standard stuff you see on every website’s checkout, first and last name, email, password, country, phone number, etc.
Finally, enter your payment information to continue.
STEP 5. SELECT (OPTIONAL) ADD-ONS
So, now you can pick how long you want your Bluehost package to last (12, 24, or 36 months) and pick some add-ons.
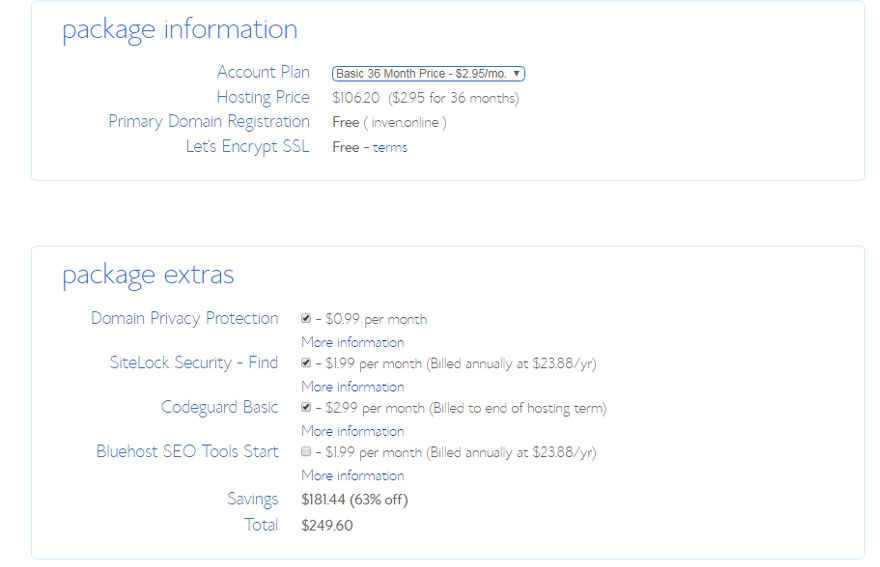
These are the last steps you’ll go through before your account creation is complete. Pay close attention to the extra options available, like Domain Privacy Protection.
DOMAIN PRIVACY
Domain Privacy Protection is only $0.99 cents more per month. It will keep your personal information, e.g your name and address, private.
If you want to keep your website and domain information anonymous, spend the extra $0.99 per month. If you don’t, be sure to uncheck this box.
SITE BACKUP PRO
This provides extra security to your website. WordPress is very secure, but this extra feature allows you to backup your site regularly. If you think you’ll use this feature, it’s definitely worth the extra $2.99 per month or $35.88 per year.
SSL CERTIFICATE
An SSL certificate protects your customers sensitive information. This add-on is best suited for people running websites where products are sold and customer personal details and payment information may be stored.
SITE LOCK SECURITY
This $1.99 a month add-on provides some extra security for your domain, including malware scans DDoS protection and some other standard website protection.
This add-on is best suited for people running websites where products are sold and payment information may be stored.
I don’t recommend that you get this add-on.
SEARCH ENGINE JUMPSTART
Bluehost claims that this tool can help you get search engine rankings. This feature is also $2.99 per month or $35.88 per year.
STEP 6. THAT’S IT – YOU’VE SIGNED UP WITH BLUEHOST!

Once you have chosen your add-ons you are finished. Hit the “submit” button and you’re done.
You will receive an email from Bluehost confirming your hosting account and it has all the logins that you need to get started.